
- You are here:
- Home »
- Drills/Exercises
Category Archives for Drills/Exercises

Attacking Play and Finishing Around The Box
By Gregg Gillies –
Set Up: Size (25 x 20 yards) at least 12 players plus 2 GK
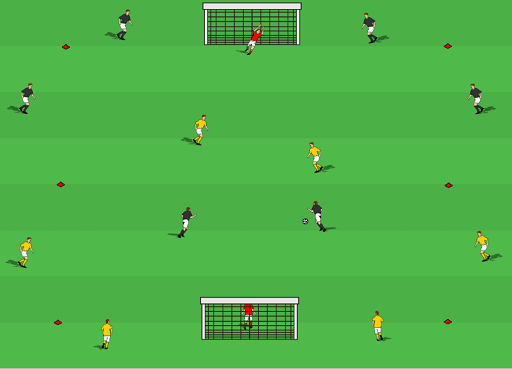
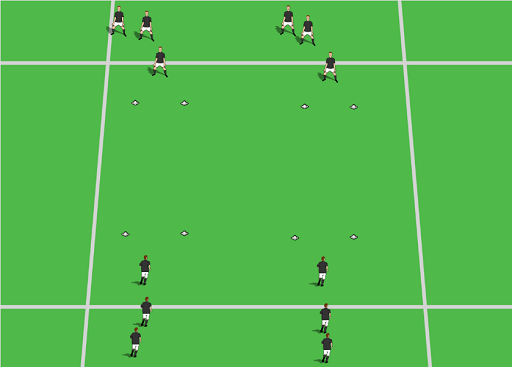
The Drill: Two teams (black and yellow). Each team has 2 players on the field of play. Each team also has two players on the outside of the cones, on the offensive half only.
Both teams have two players on the endline, one on each side of the goal. These players are in the offensive half. In other words, as seen in diagram 1 below, the team in black is shooting on the goal that has their teammates standing next to the goal. Yellow is shooting on the goal with the the yellow players on the endline.
Play 2 v 2 in the middle with each team having 4 outside players they can pass to. Only the 2 players in the middle can score. Offensively speaking, the drill uses 6 attacking players similar to the front 6 of a 4-4-2 with the 2 in the middle being the central midfielders. The two out wide are the outside midfielders.
The two on the endline are like back to goal forwards. While having them on the endline is somewhat unrealistic the positives out way the negatives as there are a lot more scoring opportunities with them there. To help the players understand it visually, think of them as players who got endline and are playing cut back crosses.
Limit the outside players to one or two touches. With two touches the ball can’t stop moving. If they are skilled enough make it one touch.
Outside players can play to outside players.
Make sure there are a number of balls in each goal.
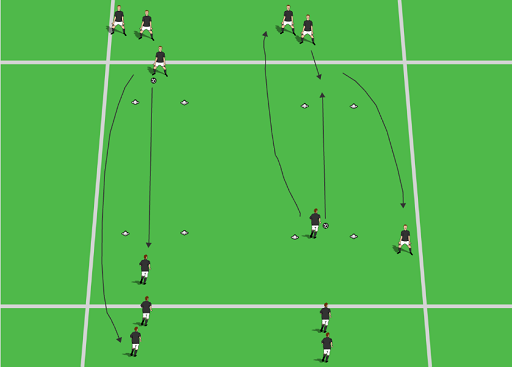
Winners stay on. Losers rotate. The 2 players on the field go to the endline. The two endline players rotate to the wide positions and the wide players move on to the field and play. See diagram 3 below.
The winners race back and grab a ball out of their own net and begin play. They do NOT wait for the yellow team to get organized.
This is a high tempo, competitive attacking game. As the players get used to the game, there should be a lot of shots and goals. In order to keep things moving, consider a time limit. If neither team scores in a minute, or 90 seconds or two minutes, make both teams rotate. Call out which team gets the ball.
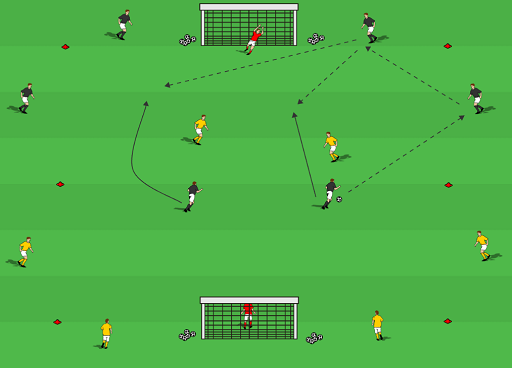
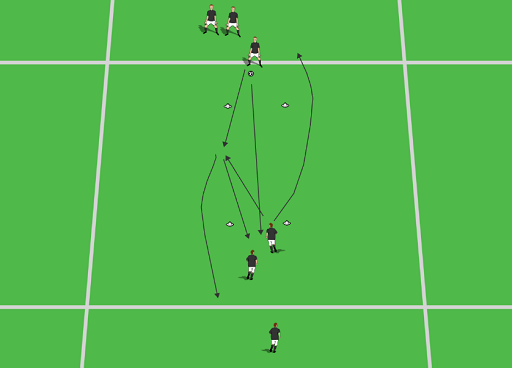
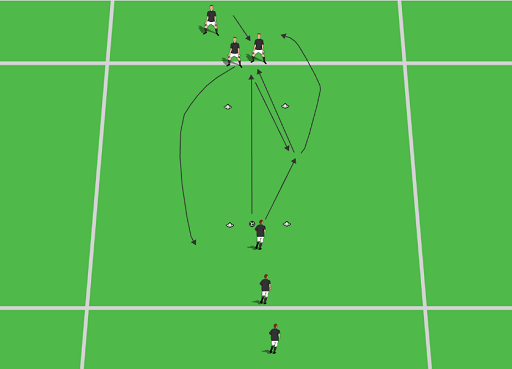
Here is an example of combination play using the outside players.
Diagram 3 (This is the rotation example with the black team scoring)
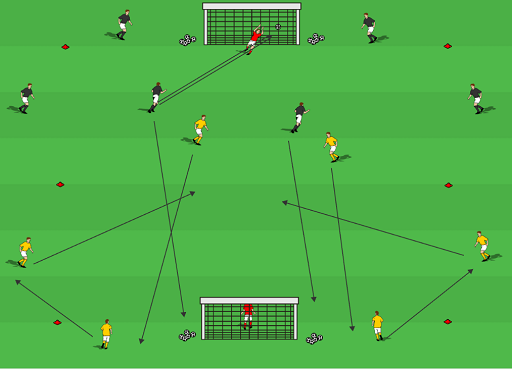
The two players in black go back to get a ball out of their goal. For yellow, the players in the middle go to the endline. The endline players go out wide and the wide players come inside to defend.
Coaching Points
Finding shooting angles. Except for the younger age groups, almost anywhere on the field of play is a shooting opportunity, with only 25 yards from goal to goal. They don’t need to dribble by a player, they just need to use a fake or feint to create a shooting angle around the defender.
Making runs. The two players in the middle should never be standing still.
Variety of runs. It shouldn’t always be vertical runs up the field. The two players in the middle shouldn’t always be on one side of the field.
Using the outside players. Players, especially younger ones, have a tendency to ignore outside players or neutral offensive players, which negates the entire reason for having them. Encourage the 2 in the middle to use the outside players to help them create more chances.
High tempo
Communication
Quick combination play
Vision, awareness and anticipation. If players don’t get their heads up and think ahead, they will not be able to work together to create scoring opportunities. With the one touch restriction outside players must be anticipating and thinking ahead at all times.
Progression/Variation
Limit the outside players to one touch.
Have the outside players only play crosses instead of looking to make passes to feet. To facilitate an emphasis on crosses, maybe widen the field 5 yards on each side.
Progress to 4v4 in the middle. Increase the length of the field from goal to goal to a double box, 36 yards.
As the players get used to the drill and the rotation, this will become a high tempo attacking exercise with a lot of shooting and finishing for the players without them standing around in lines waiting for their turn.
By Gregg Gillies
Gregg Gillies is a nationally licensed coach through the USSF and is a Youth Athlete Development Specialist and Head Coach at Mount Laurel United Soccer Club, where he currently coaches a u14 girls team, the MLU Raptors. He also is the owner of www.NoLimitsSoccerTraining.com, where his focus is on maximizing a player’s individual technical skills, soccer IQ, and overall athletic development.

Competitive Technical Passing
By Gregg Gillies –
Warm Up
Set Up: Space can vary depending on number of players and how difficult you want it to be. Set up a variety of cone “goals” randomly throughout a space and pair up your players in teams of two, each team has one ball. Use at least 5 cone “goals.”
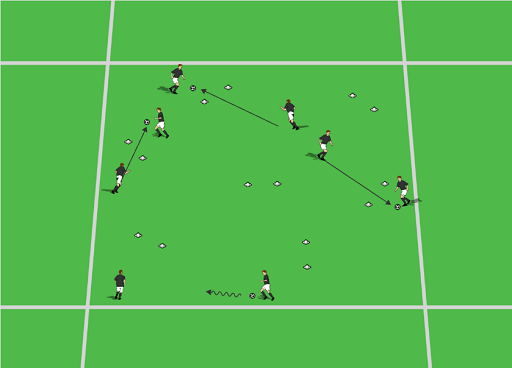
The players, in pairs with one ball, are to complete as many passes as they possibly can through the cone goals scattered thoughout the playing area, in a set amount of time (30 to 90 seconds). The team with the highest number of completed passes wins.
Players can not complete multiple passes through the same goal without going to at least two other goals first.
You can vary the number of goals and size of the playing area to make the drills more or less difficult. The smaller the area, the more traffic that each team needs to be aware of and avoid, making the game more challenging.
Make the receiving player of a pass that scores a goal call out the number of that goal, loud and proud. This helps with getting players to talk, especially at younger ages.
Coaching Points:
The accuracy and pace of the pass, as well as good communication between players on a team are extremely important in being successful at this drill.
Players need to keep their heads up and be aware of their surroundings so they don’t run into other players or have a pass fail because it hit another player or another teams ball.
The quality of all touches is important so traffic can be avoided, causing time to be lost if a ball is knocked away via a collision with another player or another ball.
Progressions and Variations
Set Up: See below in diagram two. Divide up into multiple teams of four to six players. The cones that need to be passed through and the distance between the cones will depend on the skill level of your players. 10 to 12 yard passes are long enough distance wise as we are looking for quick, quality passes on the ground with at most two touches, one if possible.
Passes must go between the two cones in front of the player you are passing to. That player can then play a one touch pass or take a first touch. The return pass must also go through the far two cones. When a pass is made, that player goes to the back of the next line.
The teams are competing to complete the most number of passes in a set time like 30 or 45 seconds. Any pass that does not go through the far two cones, does not count. This is true if the pass goes wide, but also true of the receiving player steps up and takes their first touch ahead of the cones without letting the ball travel through.
Coaching Points
Focus on accuracy and weight of the pass. A good, solid pass that allows a teammate to return it with one touch will give a team the ability to complete more passes in the time allowed. The more touches a teammate must take to control the pass, the fewer total passes that will be completed.
Whichever team completes the most number of passes wins.
The competition and cones takes a simple, boring passing drill and dramatically increases the intensity and focus of the players.
Progression/Variation #2
Same Set up but add a 1-2 into the senquence as shown below in diagrams 4 and 5.
In this version, count all passes completed that go through the cones.
These drills and variations are a great way to work on technique without defense but also add an ellement of pressure and intensity (as well as focus) that you don’t get with typical drills. Adding that element of competition can help players more quickly develop their technique and skill.
One last thought on the competition element. You can create two (or three or more depending on total number of players) to make it one overall competition by adding the total number of passes completed through each variaton.
For example, let’s say you have 12 players and in the team passing drill, you have 3 reams, which is 4 players per team. For the first drill, when they are working in pairs, separate them into 3 teams of 4 players and then into pairs within each team.
The total number of completed passes is the total of the passes completed by the pairs within each team. Then keep the same teams throughout all variations, with the winner being total number of passes completed throughoug the session.
By Gregg Gillies
Gregg Gillies is a nationally licensed coach through the USSF and is a Youth Athlete Development Specialist and Head Coach at Mount Laurel United Soccer Club, where he currently coaches a u14 girls team, the MLU Raptors. He also is the owner of www.NoLimitsSoccerTraining.com, where his focus is on maximizing a player’s individual technical skills, soccer IQ, and overall athletic development.

Show and Go-Go and Show
By Gregg Gillies –
Players, especially at a younger age, struggle with the concept of specific off the ball movements in order to create space from a defender and get open to receive a pass. In this drill we are going to work on creating space using the specific techniques of ‘show to go’ and ‘go to show’, also known as ‘check away and to’ and ‘check to and away.’
Set Up: (20 yds x 10 yds) 3 players per group as shown below in diagram 1. Include a cone square in the middle with the cones roughly 4 yards apart.
There is a player at each end and one in the middle, standing next to one of the four cones. We are working on two specific movements – going away from the ball and showing back to it as well as showing to the ball and then going away into space.
Diagram 1
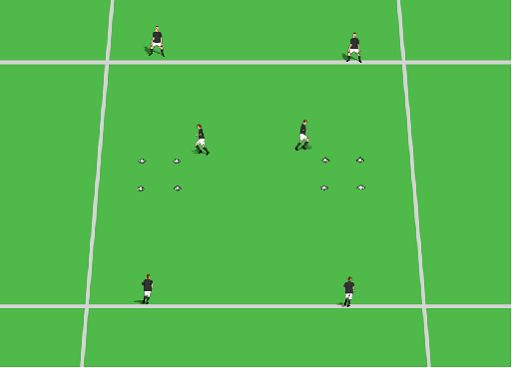
Above is the starting position of the drill. It shows two groups. The first group on the left will go through the show to go movement and the second will show the go to show movement. This can be seen below in Diagram 2.
Diagram 2
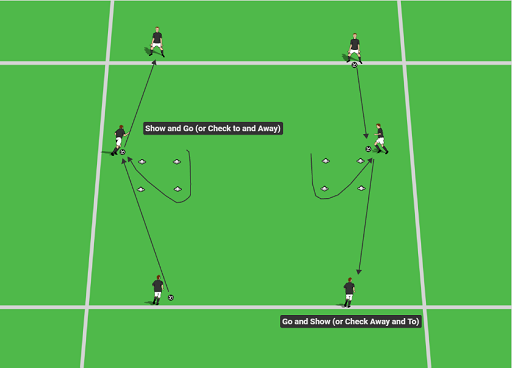
On the left, the player moves parallel to the two cones, toward the player with the ball and then bends the run diagonally away to create space from the defender, in order to receive a longer pass.
On the right, the player is starting closer to the player with the ball, starts the run away, and then bends back diagonally, sprinting into space in a support position to receive the pass, preferably in a side on position to be able to see the field. To do this the player must sell the “go” run in order to create enough space from the defender to receive the ball in this position, with the outside, or back, foot.
Once they receive the ball, they pass it to the third player on the other endline.
When initialy learning these movements with younger players, you can teach them one and reset after each play through.
Once they know the two movements, as you can see above, after passing the ball to the third player, they are in position to make the opposite run. If they started with a ‘show to go’ they are now in the starting position of the ‘go to show.’
When they know both, the drill can continue nonstop with the same player in the middle. You can rotate the middle player ever 60 to 120 seconds.
Coaching Points
The player needs to be decisive with their movement so that the defender sees it and stays with them on the initial run. Then the player turns quickly, changing the run and leaving the defender behind as they move into space to receive the pass.
The player needs to sell the initial movement to draw the defender before moving into space.
Timing – stress the importance of the timing, both of the run and the pass, so that the pass is received in space at the appropriate time.
Body Positioning – the player should check their shoulder on the “go to show” movement to be sure they can get in a side on position to receive the pass. While it’s not always possible in the game, be sure they put in the extra effort on the run to always get side on in this drill with no defense.
By getting side on and taking the ball with the back foot they are able to see the entire field as they receive the ball, giving them more time to make a decision.
In the ‘show to go’ movement, when successfully employed, the body positioning is completely different. In ‘show to go’, you are hoping for a slightly longer pass that can be played ahead of the player, into space for them to run on to, preferably to the outside of the now trailing defender, keeping the offensive player’s body between the ball and the defender.
Creating Space – The most important thing to know is where is the defender. This, along with the timing, weight and accuracy of the pass, will determine how a player is able to receive the ball. How do we do this? The player making the run must check their shoulder so they know if they’ve created enough space between them and the defender to open up and receive the ball in a side on position.
Decision Making – the player receiving the pass needs to make the correct decision on how best to receive the pass in order to keep possession.
Technique – a good decision needs to be followed by a quality first touch that allows the player to keep the ball and be able to make a decision to dribble or pass.
Progressions
In the first progression, as seen in Diagram 3 below, is quite simple. Remove the four cones making a square and replace with one cone, or pole to simulate the defender. Now the players need to make the same runs without the extra guidance of the four cones showing them exactly where to start the run and change direction.
With older more experienced players, you may start here (or even with the second progression in diagrams 4 and 5).
Diagram 3

The next progression is seen in Diagrams 4 and 5. This uses a passive defender.
Diagram 4 (Go to Show)
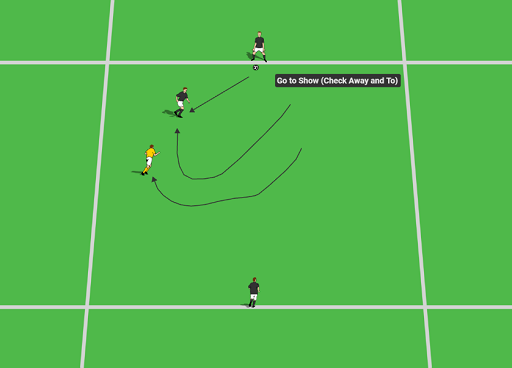
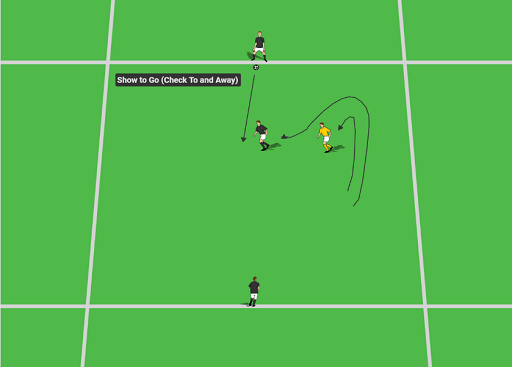
Diagram 5 (Show to Go)
Once the players are doing well with this, you can have the defenders vary their response to the run. Sometimes let enough space be created (especially in Go to Show) so that the player receiving the pass can get side on. Sometimes have the defender not be fooled (but allow the player to receive the pass) and trail the offensive player but in a closer position so getting side on to receive would be difficult.
This will help get the player used to checking their shoulder and making decisions on how best to receive the pass.
Finally, you can have the defender go 100%. The offensive player’s goal in the middle is to receive a pass using these techniques and make a pass to the player on the other endline. Always restart with the offensive and defensive players in the middle.
The choice of which run to make is up to the offensive player. The defender knows it’s one of two runs, but not which one.
Movement off the ball, especially specific runs and techniques are not natural for younger players. They watch the ball. Including these two simple runs can help with that.
By Gregg Gillies
Gregg Gillies is a nationally licensed coach through the USSF and is a Youth Athlete Development Specialist and Head Coach at Mount Laurel United Soccer Club, where he currently coaches a u14 girls team, the MLU Raptors. He also is the owner of www.NoLimitsSoccerTraining.com, where his focus is on maximizing a player’s individual technical skills, soccer IQ, and overall athletic development.