
- You are here:
- Home »
- Drills/Exercises
Category Archives for Drills/Exercises

Finishing from 4 Areas
By Sean Reed –
Objective
For this session we are focusing on a finishing session; receiving the ball from 4 different areas in order to finish on goal.
Set Up – Part 1
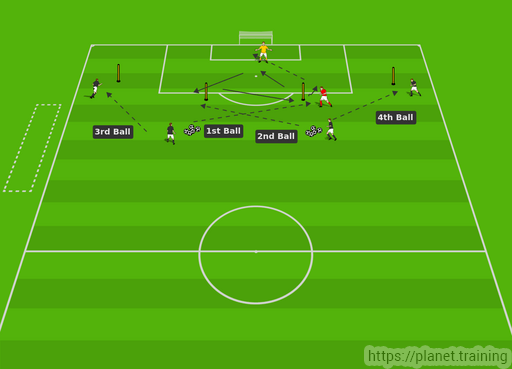
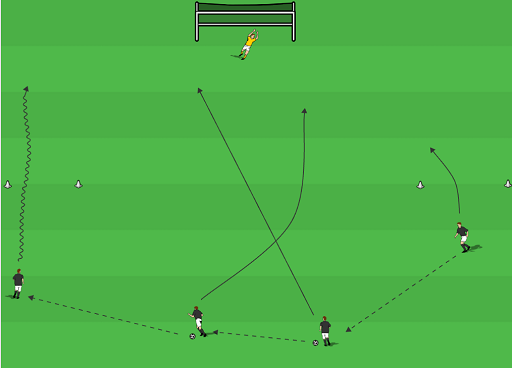
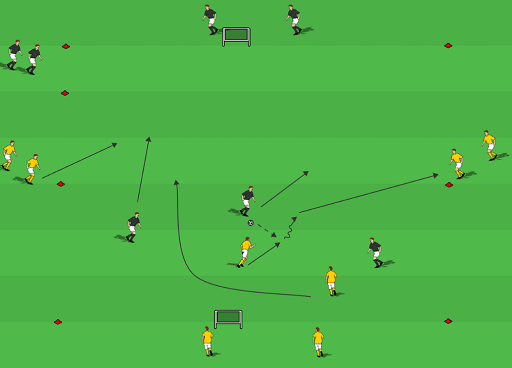
The session takes place in around the in around the penalty area. Players include: 1x GK / 4 x servers / 1 x attacking player. The players serving and attacking will rotate. The attacking player has 4x finishes on goal (max 2 touch per finish).
Ball 1: Attacking players starts goal side of the pole / marker. Played on the angle to receive on the back foot and finish with the right food.
Ball 2: As with ball 1, but on the left foot.
Ball 3: Attacking player gets goal side of the pole, a ball is played from the central server to the wide player who takes a touch past the pole to then deliver a ball into the middle.
Ball 4: As with ball 3 but on the other side.
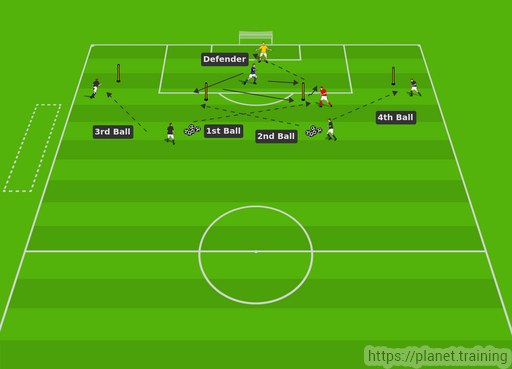
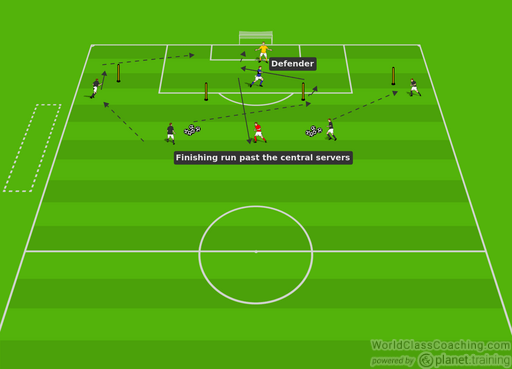
The attacking player must then finish by running past the two central servers. See Diagram 3
Progressions
• Apply a time limit in order to complete the 4 finishes in (i.e 1 min)
• Ball in wide areas can be delivered either in the air or on the ground
Set – Up – Part 2
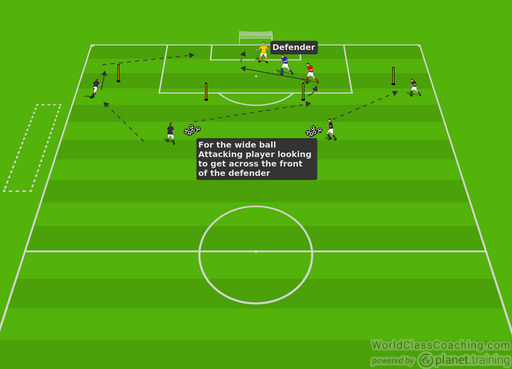
The 2nd part of the session continues from the previous finishing session, but for this part of the session we have included a defender. The starting position for the defender is just a few yards off the attacking player. They can make their movement as the ball is played from the servers.
When introducing the defender for the initial few goes the defender can be there to apply passive pressure, after which they become live and apply full contact. For the ball in wide areas, as the attacking player gets themselves goal side of the pole, the defender becomes active
Some Coaching Points
• Movement to receive the ball
• Body shape when receiving the ball
• 1st touch
• Shot across the goal
• Being positive to attack the ball
• Get across the front of the defender
• Work rate, to get back goal side
• Clever movement to lose defender
• End product on target
By Sean Reed
Former First Team Coach of Championship team Fulham FC. Sean is a UEFA A Coach with a Masters in Sport Coaching. He has over 15 years of experience working in professional football from Academy through to First team in the Premiership and Championship.
Web – www.seanjreed.com
Twitter – @SeanJReed

Managing the Underload
By Sean Reed –
Objective
For this session we are focusing on challenging the players with an under load in possession as oppose to an overload. Challenging the players to maintain possession under pressure, managing the ball individual, creating passing and goal scoring opportunities.
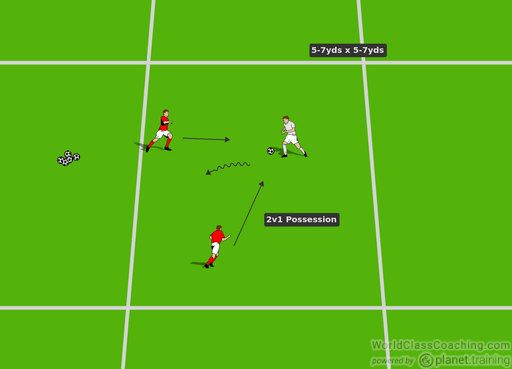
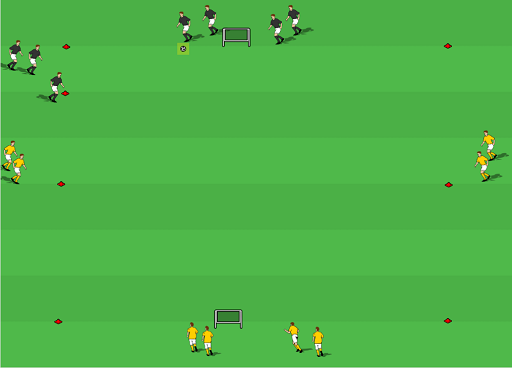
Set Up
• 3 Players within an area (5-7yds)
• Two teams (2 = Red / 1 = White)
• The player on their own is looking to keep possession of the ball from the other team (2 players)
• It is the length of time the single player can keep possession of the ball
• If the red team wins possession then they will make a few passes before playing the ball back
• The coach can work for a set period of time 60-90 secs then switch the players round
• See Diagram 1
Progressions
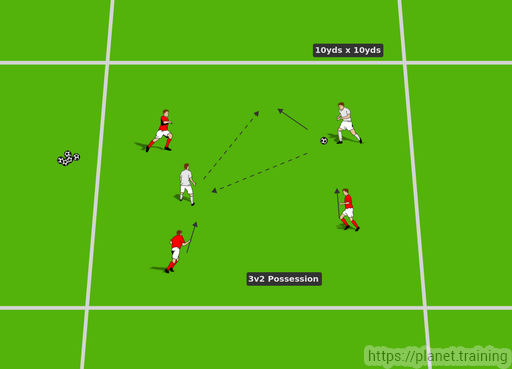
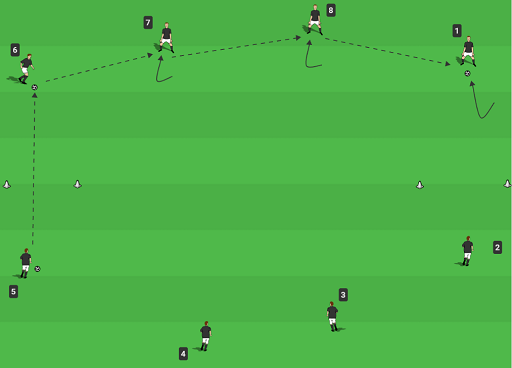
• Develop the game into a 3v2 possession
• The size of the area will increase (10yd x 10yds)
• The objective is for the team in white bibs (2) to keep the ball away from the team in red bibs (3)
• The score can be calculated based on the number of consecutive passes made and/or the amount of consecutive time the team kept possession
• See Diagram 2
Progressions
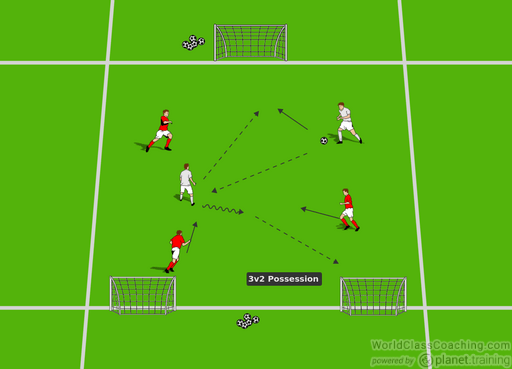
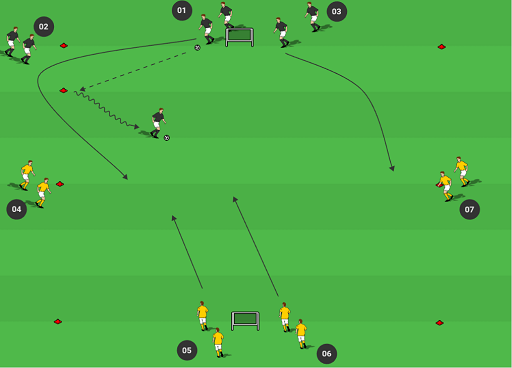
• Develop from the 3v2 possession into a directional possession
• See Diagram 3
• The team with 2 players are scoring in two goals
• The team with 3 players are scoring in 1 goal
• The game can start in favour of the team with 2 players as the emphasis is on managing the underload
• However, the coach can change and adapt how the game starts
Some Coaching Points –
• Strength / Use of body / Body position between ball and player
• Ball control under pressure managing the ball
• Tempo and speed of moving the ball
• Angles of support
• Passing the ball and receiving safe side
• Exploiting games
• Creating 1v1 situations
• Confidence in possession
• Positive in possession
By Sean Reed
Former First Team Coach of Championship side Fulham FC. Sean is a UEFA A Coach with a Masters in Sport Coaching. He has over 15 years of experience working in professional football from Academy through to First team in the Premiership and Championship.
Web – www.seanjreed.com
Twitter – @SeanJReed

Forward Runs – Breaking Lines
By Sean Reed –
Objective
This session focuses on forward runs, breaking the lines to create goal-scoring opportunities.
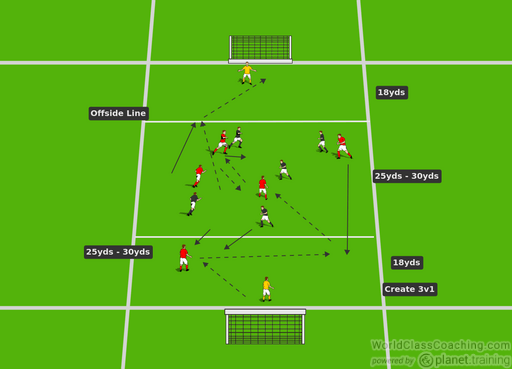
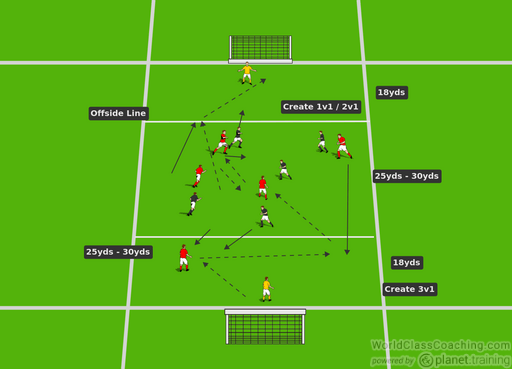
Set Up
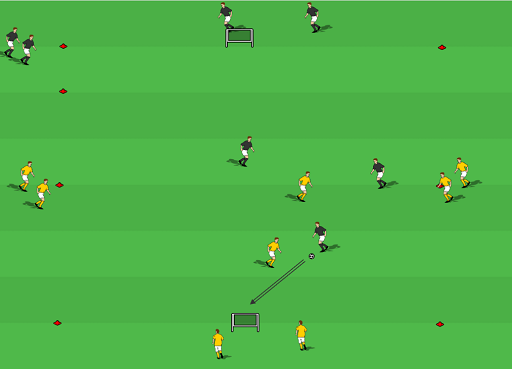
• 2 teams (5v5 upwards) with 2x GK
• Pitch is 25-30yds wide, depending on the number of players
• 18yds each GK area and middle area 25-30yds
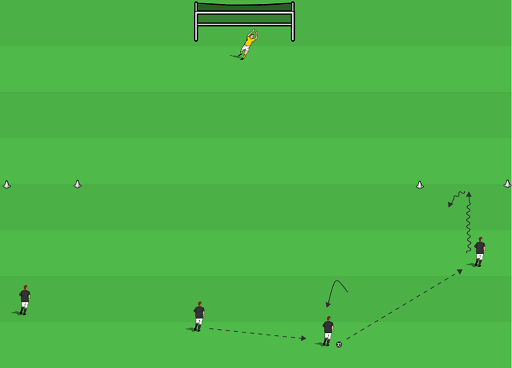
• Ball starts with GK, one player from the attacking team can drop in to receive the ball (unopposed)
• Ball is played into the area and the team in possession are looking to create opportunities by playing a pass into the attacking third, where only 1 player is allowed to go into it
• The player making movement into the attacking zone must time their run, and can not be in there before the ball is in there (space, ball, player) or before the ball is played (depending in the coach)
• Once in the final third the attacking player has 2 touches to shoot
• If the team score they retain possession from their GK
• See Diagram 1

Progressions
• Restriction on touches
• Number of passes before a forward pass can be played into the attacking third
• When the player drops down to receive the ball from the GK, an attacking player can drop in to create a 2v1
• As above, but another player can drop down to create a 3v1
• See Diagram 2
Progressions
• In the attacking third a defender can drop in to defend the attacking player
• As above, but an attacking player can join in to create a 2v1
• See Diagram 3
Some Coaching Points – Attacking
• Angles to support the ball
• Looking to play forward
• Support to play back to play forward
• Timing of runs, from deep, across the line
• Creating space for players
• End products
By Sean Reed
Former First Team Coach of Championship side Fulham FC. Sean is a UEFA A Coach with a Masters in Sport Coaching. He has over 15 years of experience working in professional football from Academy through to First team in the Premiership and Championship.
Web – www.seanjreed.com
Twitter – @SeanJReed

Receiving, Passing and Dribbling
By Anthony Hazelwood –
The ability to successfully control a ball during a receiving or dribbling action is crucial to meet individual and team tactical agendas. This activity aids the player to practice a first touch into a vacant space action and to follow it up with a dribbling change of direction activity.
Technical Activity:
Area Size:
Pair of red cones 1 yd. away from each other.
A pair of blue cones located left and right 5 yards away from the pair of red cones.
One yellow cone located 7 yds. above each pair of red cones (see diagram below).
Total Activity Time: 10 minutes.
Sets: 1 set.
Activity Repetitions: 10 repetitions for each player.
Time of Activity Repetition per player: 30 seconds.
Intensity: Moderate.
Objectives:
Technique: Different receiving, dribbling, and passing variation patterns at moderately high ball speed.
Concentration Level: High.
Setup:
Players are placed into pairs. Each pair goes to a passing station.
Each passing station includes a pair of red cones one yd. away from each other.
A pair of blue cones located left and right 5 yards away from the pair of red cones.
One yellow cone located 7 yds. above each pair of red cones.
Exercise 1:
To start, the player on the black cone will pass to the teammate at the red cones.
The player in black will play a first touch (punch the ball) in between the red cones.
Then a dribbling action in between the two blue cones.
Once this is accomplished, the player will change directions and quickly dribble to the yellow cone go around it and make a pass to the teammate (see diagram below).
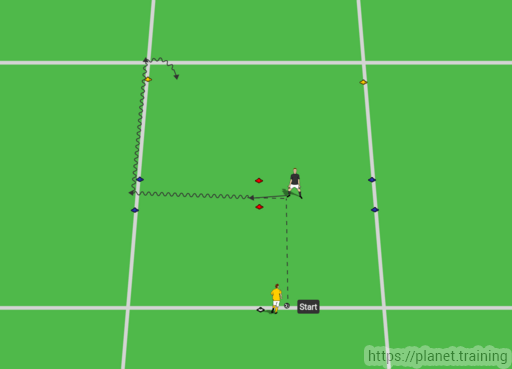
Once the ball is passed to the teammate, the yellow player will make a run to the starting space and perform the activity on the other side.
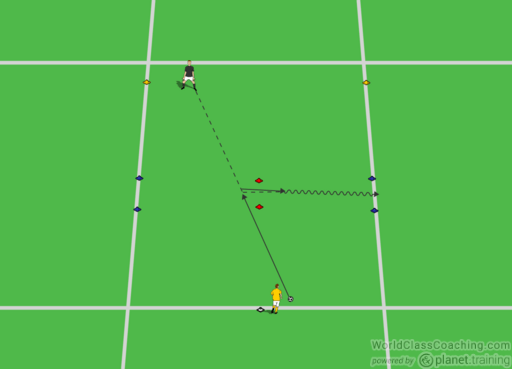
Each player repeats and performs the activity five times for 30 seconds with these variations.
Variation:
If variation is needed, then the routine may be performed with corporal restrictions.
Hands behind the back.
Hands behind the head.
Hands on shoulders.
Hands on hips.
Hands extended straight up into the air.
Coaching Points:
Make sure to practice receiving with different foot surfaces and to complete first touch and dribbling accuracy in between and around the cones.
Always alert and on their toes, focus is key.
By Anthony Hazelwood
Current Seattle Sounders Academy Performance Coach with previous European academy coaching experience as an assistant fitness and strength/conditioning soccer coach with Levante U.D. (2013-2014) and Getafe SAD CF (2015-2016) in Valencia and Madrid, Spain respectively. A USSF “A” licensed coach with a BSc in Physical Education and an MSc in Sports Training and Nutrition.

Individual Passing and Receiving
By Anthony Hazelwood –
Passing and receiving a soccer ball during a match is a penetrative or possession-based action between a pair of soccer players. The ability to perform these actions will be dictated by a decision-making process guided by the presented on-field scenarios. To solve these on-field situations, these two points should be considered:
• There is no one way to perform a technical execution.
• No action will ever be the same.
However, via individual biomechanical subjective actions, predominant passing and receiving technical executions will be performed by an athlete and mimicked more than others. Therefore, each player has a predominant reactional playing habit or neuromuscular behavioral pattern that is typically executed and in theory observed more than others.
To summarize, the scenario and tactical decision-making action will dictate a technical action to solve the soccer specific scenarios in a match or competitive practice setting. Therefore, adding variations in already learned technical execution patterns is important for player improvement to further solve in game situations.
Technical Activity:
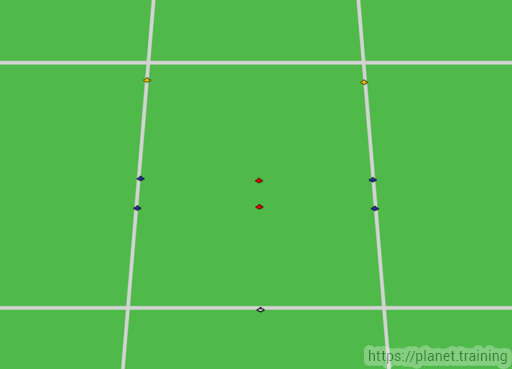
• Area Size: Pair of red cones 1 yd. away from each other – blue cone located 3 yd. away from red cones.
• Total Activity Time: 20 minutes.
• Sets: 1 set.
• Activity Repetitions: 20 repetitions for each player.
• Time of Activity Repetition per player: 30 seconds.
• Intensity: Low to Moderate.
Objectives:
• Technique: Different passing and receiving variation patterns at moderately high ball speed.
• Concentration Level: Moderate.
Setup:
• Players are placed into pairs.
• Each pair goes to a passing station.
• Each passing station includes a pair of red cones one yd. away from each other.
• A blue cone is placed three yards away from the red paired cones.
• See below diagram for setup.
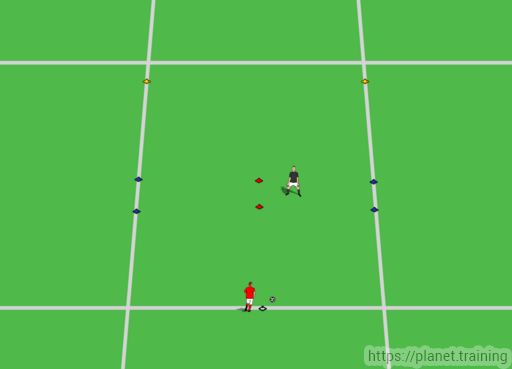
Exercise 1:
• To start, the player at the blue cone will pass to the teammate at the red cones.
• The objective for the player at the red cones will be to receive the ball and slightly punch the ball between the red cones.
• Once the ball goes in between the red cones, the player will quickly shift to the other side of the red cones and quickly pass the ball back to his teammate.
• The player at the red cones will now be on the other side of the cones and will repeat the same action on each side of the red cones.
• Each player repeats and performs the activity five times for 30 seconds with these variations.
o Hands behind the back.
o Hands behind the head.
o Hands on shoulders.
o Hands on hips.
o Hands extended straight up into the air.
Exercise 2:
• To start, one player will have the ball and will stay central and between the paired cones.
• The objective for the other teammate is to one time pass the ball back at the left, in between and the right side of the paired cones (as seen below).
• Each player repeats and performs the activity five times for 30 seconds with these variations.
o Hands behind the back.
o Hands behind the head.
o Hands on shoulders.
o Hands on hips.
o Hands extended straight up into the air.
By Anthony Hazelwood
Current Seattle Sounders Academy Performance Coach with previous European academy coaching experience as an assistant fitness and strength/conditioning soccer coach with Levante U.D. (2013-2014) and Getafe SAD CF (2015-2016) in Valencia and Madrid, Spain respectively. A USSF “A” licensed coach with a BSc in Physical Education and an MSc in Sports Training and Nutrition.

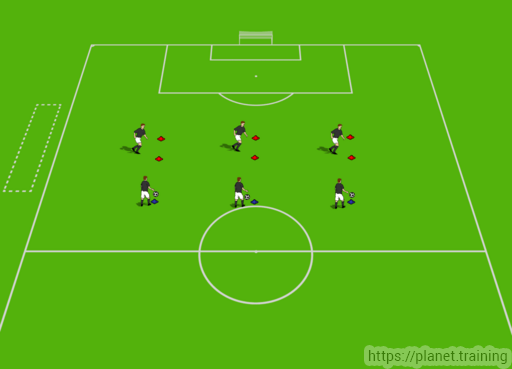
Center Midfielders Possession 4v4
By Gregg Gillies –
Set Up: Area 30×20 divided into 4 rectangle areas (15×10). 4V4 + 4. See Diagram 1 below for the set up of the players. The attackers are the players in black. The defenders are in yellow. You can adjust the size based on your players age and skill level.
The Drill: The two black players in the middle (the central midfielders) can move in all four rectangles but must not occupy the same rectangle at the same time.
There is 1 defender per rectangle.
The players on the outside can move along the full length of their designated line.
Diagram 1
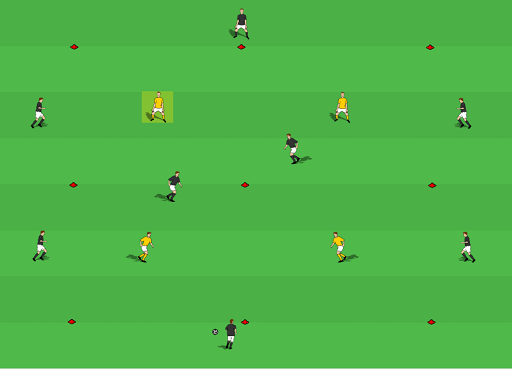
The position of the players mimics a 4-4-2 formation, minus one center back and one forward.
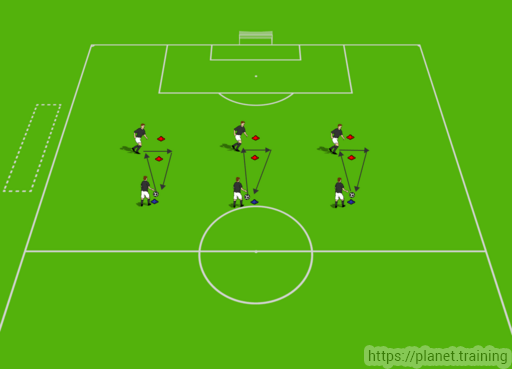
Black Team (Attackers): Maintain positions and possession of the ball with the emphasis on going forward from Centre Back to Forward (from the bottom of Diagram 1 to the top), rotating through the middle and utilizing passing options of support players, creating diamond and triangle shapes.
Diagram 2
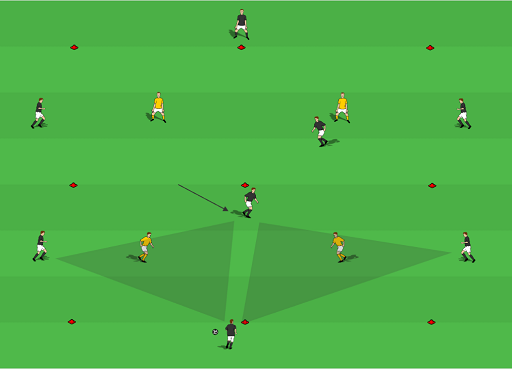
In diagram 2 above, one of the central midfielders drops into the hole between the two opposing forwards, creating two triangles of support for the ball. The outside players slide down off the shoulders of the defenders to give wide passing options,
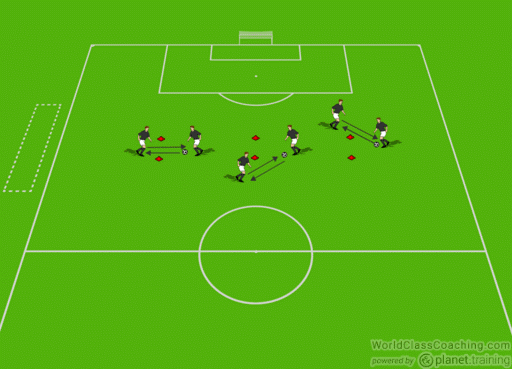
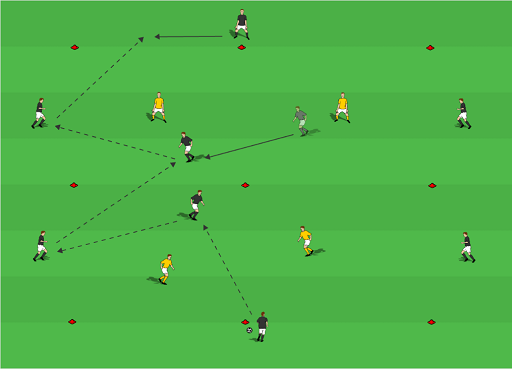
Diagram 3

These players look to create passing options (triangles and diamonds) in wide areas to penetrate and advance forwards.
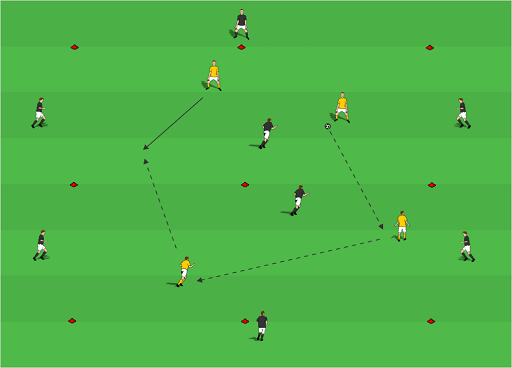
Diagram 4
Yellow Team (Defenders): If possession is won, there are two options. Either play to the bottom player in black (center back) as quickly as possible, which replicates a counter attack in a game, or maintain possession 4 vs 2 in the central area (see below in Diagram 5. The center mids have to work hard in attack and then also work hard in defense to quickly win the ball back.
Diagram 5
Competition: For the offense of 8, 10 passes is a point. If the defense steals the ball and manages to make 5 passes in the 4 v 2 in the middle, they score a point. Of course, you can adjust this number based on the age and skill level of your players.
Progression
When the attackers have success, add the condition that the defenders can move freely instead of staying in their rectangle.
Allow the wide “midfielder to go inside when the ball is in their half, also allowing the wide “fullbacks” to move up. Use rotation to create attacking overloads higher up the pitch, through overlapping and inverted runs.
Key Coaching Points
- Angles and distances between the wide players (simulating Full Backs and Wide Attackers) and Central Midfielders (game realistic)
- Quality, weight and decision of the pass (penetrate, play around or retain)
- Movement (Rotation) to receive and create diamond and triangle passing options
- Body shape to receive (taking the ball with the back foot)
- Angles, distances and combinations to penetrate effectively
- When to advance forwards and when to move inside
- Understanding slow and quick play through the areas
- Timing of passes
- Use the 3 passing lines (in front of defense, around defense & through defense) to create opportunities to penetrate
- Passing options around, behind and ahead of the ball
- Communication
By Gregg Gillies
Gregg Gillies is a nationally licensed coach through the USSF and is a Youth Athlete Development Specialist and Head Coach at Mount Laurel United Soccer Club, where he currently coaches a u14 girls team, the MLU Raptors. He also is the owner of www.NoLimitsSoccerTraining.com, where his focus is on maximizing a player’s individual technical skills, soccer IQ, and overall athletic development.

Switching Field of Play and Crossing Part One
By Gregg Gillies –
Set Up: Size (dependent on strength and skill of your players) at least 8-10 players plus GK (in the progression). 6 player set up, as seen in diagram 1 below. Have at least 8, with an extra player behind Player #1 and Player #4. If you have more than 8, you can put players behind any of the other spots. As seen in Diagram 1, you can use mannequins for the middle players to check away from and receive passes. You can also simply use corner flags or cones.
The Drill:
Players #1 and #4 each start with a ball. Players #5, 6 and 1 mirror players 2, 3, and 4 below. For the players to understand how this fits into a game, these can be either backs or midfielders. Player #1 plays to Player #2 (this is like a fullback playing to an outside midfielder if that helps your players visualize). Player #3 starts at the manniquin and checks back into open space to support Player #2 when the ball is received.
Player #3 opens up, let’s the bal roll across the body and takes the first touch with the left foot. Player #4 checks back to support and receive a pass from Player #3 (this pass should be with the right foot). The sequence starts again with Player #4 playing up the field to Player #5 the same way Player #1 passed to Player #2. Player #5 is in the Player #2 role and Player #6 is in the Player #3 role.
Depending on the skill level of your players, you may initially perform this drill with only one ball, starting at Player #1. Once they understand the drill and absorb the important details, such as checking into space, you can start with a ball at Player #4 and Player #1.
Each player follows their pass. Diagram 2 shows the completion of the passing sequence.
Diagram 1 (set up)

Diagram 2
Diagram 3
Progression: Diagram 3 and Diagram 4 adds a fourth player to the mix. Now you’re working with a backline or midfield that has four players. The drill continues in the same manner.
Diagram 4
Coaching Points
The central player needs to start next to the manniquin (or cone) and drop into the support space to receive the pass facing forward. In the diagrams above, this would mean opening up and receiving with the left foot and then passing with the right foot.
When the central player takes that first touch, the outside player needs to drop back, open up their body and also take their first touch facing forward.
Make sure the players open up, receive with the proper foot and pass with the proper foot. In going left to right, the receiving touch should be with the left foot and the pass should be with the right foot.
The details are very important in a drill like this. The timing of the checks into space, the quality of the first touch, as well as the correct foot, the accuracy of the passes, as well as which foot makes the pass.
Opem up and receive with the back foot.
Progression/Variation
Switch direction of the drill. Now the first touch is with the right foot and the pass is with the left foot.
The next progressio is to make this drill more functional by going in one direction and adding crossing and finishing as well. There will also need to be a goalie.
Now the four players involved are facing a goal and they will switch the field from one side to the other before the outside player dribbles down the line and crosses the ball.
Diagram 5
As you can see in Diagram 5 the ball goes across the field to the outside midfielder who dribbles forward, changes direction back, and plays a backwards pass to a supporting central midfielder. This midfielder plays the ball to the other central midfielder who completes the switch by playing out wide to the other outside midfielder.
This player dribbles foward to the corner and crosses the ball for a teammate to run onto.
Coaching Points
When the first outside mid dribbles forward (in diagram 5 this is the right outside midfielder), the other players move forward with him, just as in a game. When the outside mid makes his cut with the ball (as if protecting the ball from a defender), the inside midfielder needs to check back into a good support position to receive the pass.
Be sure and switch the direction so crosses come from both sides of the field.
As you can see in Diagram 6 below, the other midfielders all make specific runs. The two central midfielders cross each other with one going near post and the other going far post. The outside mid makes a late run for any cross that comes all the way through or over the central players.
Diagram 6
By Gregg Gillies
Gregg Gillies is a nationally licensed coach through the USSF and is a Youth Athlete Development Specialist and Head Coach at Mount Laurel United Soccer Club, where he currently coaches a u14 girls team, the MLU Raptors. He also is the owner of www.NoLimitsSoccerTraining.com, where his focus is on maximizing a player’s individual technical skills, soccer IQ, and overall athletic development.

3v2 to 4v3 Transition to Goal
By Gregg Gillies –
Set Up: Size (45 x 35 depending on age, skill level, etc. – can be brought down as far as 30 x 25) Depending on your technical and tactical focus as well as equipment available this can be played with small goals or full size with goalies.
See diagram 1 below for the set up of each “team.” Each team goes for either a set number of rounds, like 10, or a set time period, like 6 minutes before switching. Keep score and give the losers something to do.
The black team has three lines, one on each side of the goal and one out wide. The yellow team has a line on each side of their goal, and two players out wide at midfield.
Diagram 1
The Drill: As seen in diagram 2 (below), player 1 (in black) passes to player 2. Player 2 dribbles inside while player 1 overlaps player 2. Player 3 runs into the field of play while players 5 and 6 (defenders in yellow) come out to defend.
After the initial pass and overlap, it proceeds as a normal 3v2 to goal.
If a goal is scored or the ball goes out of bounds, the attack is over. The black players rotate amongst their three lines. The yellow players rotate amongst their four lines.
If the defenders win the ball (or the goalie makes a save if you are playing with goalies), yellow can immediately counter by playing wide to player 4 or player 7 in a 4v3 counterattack.
All lines for both teams should rotate after each round, even if yellow doesn’t win the ball and counter. So even though players 4 and 7 may not be involved in a round .they should still move to the next line. If they don’t they could get stuck doing nothing for awhile if the defense doesn’t win the ball often. Keep the players moving and playing!
Diagram 2
Diagram’s 3 and 4 are the continuation of a successful attack by the black team.
In diagram 3, the wide player continues to dribble into the middle of the field and plays wide to player 3. After the overplap, player 1 continues a diagonal run across the field, giving player 2 an option to play a pass down the line. Diagram 4 shows the finish.
Diagram 3

Diagram 4
In diagram 5, you see the transition to the 4v3. A yellow defender intercepts a pass and passes out wide, bringing the wide player on the other side into the game as well. Black now needs to quickly get organized and transition back behind the ball to stop the 4v3 counterattack.
Diagram 5
Coaching Points:
• Taking advantage of numbers up with speed of play via quick passing and runs off the ball.
• Counterattacking ability
• Timing of runs
• Variety of runs. It shouldn’t always be vertical runs up the field. This is why the drill starts with a mandatory dribble in to the center from wide and an overlap.
• Challenging players 1v1. Numbers up in a 3v2 should give players space and opportunity to challenge 1v1.
• Good decision making
• Defending numbers down
• Quickly getting organized and back as a defense when you lose the ball in the 3v2
• Closing people down
• Cutting off angles
• Communication
• Timing, vision, awareness, anticipation, speed of play and accuracy and weight of the pass are extremely important.
Progressions / Variations
Depending on your focus, as well as the team’s skill level and age, you can regress this drill and make it a 2v1 with a 3v2 transition. Just eliminate one of the two lines (one per team) next to the goals. For less experienced, skilled or younger teams, this can make things easier by reducing the number of options available so they aren’t overwhelmed by the decision making process.
To encourage speed of play and make it more difficult, set a time limit for the attacking team such a 6 or 10 seconds.
Another progresion is to make all finishes one touch.
If you want to encourage 1v1 play, then maybe a player needs at least three touches before shooting.
Many younger players struggle with varying their runs and have a tendancy to go straight up and down the field. Starting with an overlap and a wide player dribbling inside is designed to teach other options. By doing so at the beginning of a competitive drill, you can get technical and tactical work unopposed but at game speed.
You can start the drill with any number of different pass and run combinations. Maybe player 1 plays a lateral ball to player 3 while player 2 makes a diagonal run to receive from 3 while player 1 overplaps player 2.
Maybe player 1 just plays a quick give and go with player 2. This is a good way to use patterns of play within a game, at game speed but without real defensive pressure.
A bigger field will give them more room to be successful and will also double as a conditioning game. If you make the field narrower, quick, accurate combination play becomes more important.
By Gregg Gillies
Gregg Gillies is a nationally licensed coach through the USSF and is a Youth Athlete Development Specialist and Head Coach at Mount Laurel United Soccer Club, where he currently coaches a u14 girls team, the MLU Raptors. He also is the owner of www.NoLimitsSoccerTraining.com, where his focus is on maximizing a player’s individual technical skills, soccer IQ, and overall athletic development.